Not knowing how to do something, in my opinion, is never an excuse for it not to be done. This is a lesson that I try to teach my children daily. I had the opportunity to show them how to overcome the obstacle of not knowing while also learning how to retile a bathroom. When we purchased our home a few months ago, the first thing we wanted to do was rip out the carpet and terrible looking linoleum floors and replace them with something that had a more appealing appearance. The problem was, I had no idea where to begin. The first bathroom was a learning opportunity for me. It was also the most difficult of the bathrooms to complete because of all of the angles. So we decided to hire a company to do the job.

Still keeping the learning opportunity I asked if I could assist with the project. The company agreed and gave me a few discounts for my labor. Retiling a bathroom had never crossed my mind but now, I was curious about the process and wanted to learn. When the first bathroom was complete, the contractor made it look so easy that we decided I would do the next project myself.
Even after working with the contractor, I was still a little apprehensive about diving right in, So, I talked to Lowe’s flooring personnel, as well as a friend who does repair work, trying to get all of my questions answered. I even attended a Home Depot workshop on how to retile a floor. The conditions at Home Depot, however, were perfect. There was no need to cut tiles (although we did cut a few), no need to rip up old tiles, linoleum, or carpet, nor was there a need to put down an underlayment in the workshop. I left the workshop a bit more confident but, I wouldn’t know what to expect until I began to work in an uncontrolled environment, my own bathroom.

Several people told me that “tiling floors are easy”. But in the same breath, they would say that they would “never do it again”. I, however, would not say that it was easy. It was merely less difficult than my mind made it out to be.
Even after attending the workshop I was apprehensive about starting. Instead of continuing to fret about it, I simply got started. My wife looked up different methods for getting the linoleum up. The method I used was the hot iron method. This seemed like the less tedious way to remove the flooring. Other methods described standing over the floor scrapping the adhesive and tiles, as it chipped piece by piece. The iron melted the adhesive and allowed me to peal the linoleum back with relative ease.

After getting the linoleum up, we purchased all of the material we needed. I still had to do a little bit of scraping to ensure that the floor had no protruding nails and was even throughout the room, as well as removing the remaining adhesive. Then I prepared to install the underlayment. This was described as a cement(ish) barrier to keep water from the getting to the underboard. It is supposed to be easy to cut and easier to put in place. I found, though, that this was the hardest part of the entire project. The sales representative told me to get a straight edge and a utility knife to score the board and “simple snap the board to size.” Eventually, I was able to use this method, but only after getting the right tool did this method work for me. I ended up going back to the hardware store to purchase a flooring cutter, which made this part of the job immensely easier. The cuts were far from perfect, but with the right tool, it was easier.
Cutting the tile was not as difficult as I imagined either. After finishing with the underlayment, my next step was to measure and cut the tiles to dry fit them in place. It did take me a little longer than I anticipated but, hey this was my first time cutting tiles. I used a Kobalt Wet saw to cut the tiles to size. It just so happened that the day I decided to cut the tiles was the day it snowed and the water began to freeze on my tiles almost instantly. But getting them inside and wiping them down with a dry rag alleviated this problem.
As I shared my progress I received a lot of support and advice. The one thing that was said was that mixing the thin set was where most people mess up their entire project. While I did have the option to go with the premixed thin set, I decided to mix it myself.

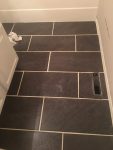
Laying my first few tiles with the thin set, was a bit stressful as I had forgotten the direction that the tiles were supposed to go. But, after I corrected my incorrectly laid tiles, I was able to move forward with little difficulty. 24-hours later, I applied the grout and replaced the toilet. A few days later I applied the sealer and my project was complete.
Looking back on the project, I am glad I decided to do this myself. Not only did it save me quite a few dollars, but I was also able to acquire a skill to add to my repertoire. I don’t think me learning how to retile bathroom, however, had the intended effect on my daughter. After I finished the project she said: “why would I have to learn, when I can call you to do it for me”!


